
Certain species of orchids make great indoor plants because they are beautiful and they are low-maintenance. They also produce lovely flowers that add bright colors to your living space. But what does it take to grow and care for orchids inside your house?
To care for orchids indoors, give them sufficient sunlight, water, fertilizer, and humidity. Some species are common houseplants and will thrive indoors as long as you give them the growing conditions they need. Knowing how to care for them properly will help you keep them alive inside your home.
Read on and learn everything you need to know about caring for orchids inside the home, including how to prepare their potting medium, how to water them, and how to feed them. You will also know where best to put your orchids and how to deal with common problems and pest issues.
Know Your Orchids
One very important thing you need to do to grow houseplants, indoors or outdoors, is to get to know them. It is imperative that you identify your plant correctly so you could look them up and do your research on how to best care for them. Get to know all about the classifications, species, genera, and family of the plants you adopt and bring into your home.
When it comes to orchids, you should also know about their growth habits and the species that would thrive inside an enclosed environment. Getting the right kinds of orchids to keep indoors will have a lot to do with how successful you will be.
First Things First: What Are Orchids?
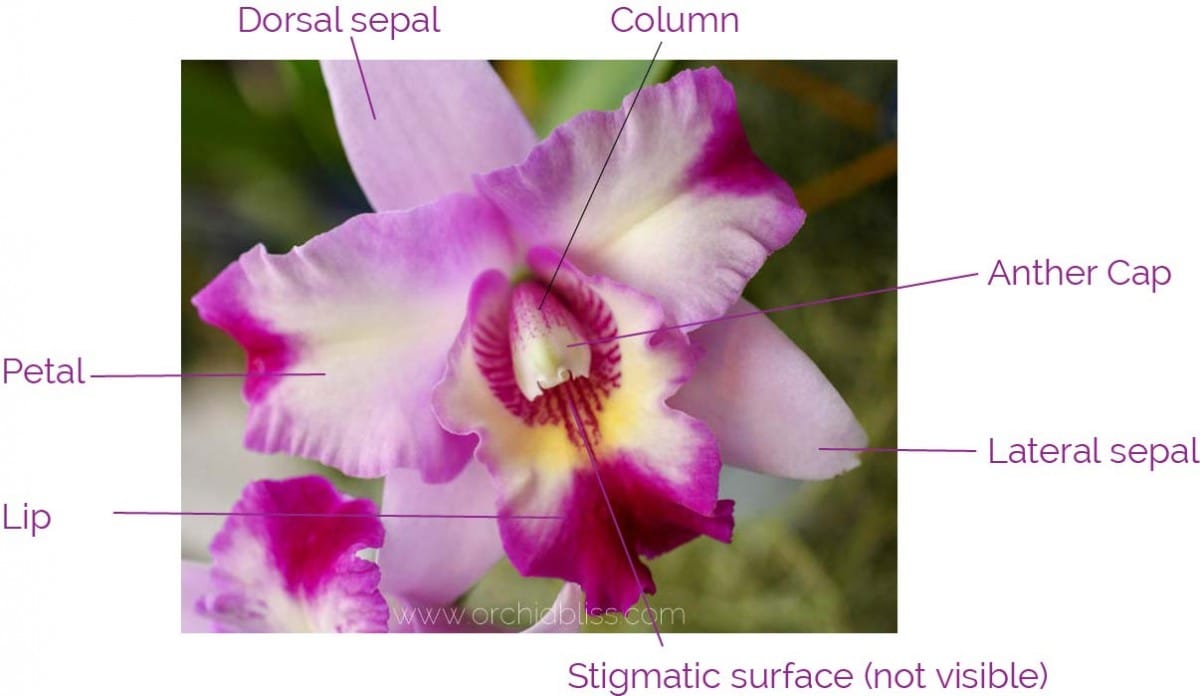
Orchids (Orchidaceae) are a diverse family of around 28,000 species of flowering plants distributed in more than 700 genera. Orchids are distinguished from other flowering plants through a unique set of characteristics, including:
- Zygomorphic or bilateral symmetry of flowers. When it comes to the symmetry of flowers, orchids are yoke-shaped and bilateral in that they can be divided into only two mirror-image halves by a single plane.
- The column. This is a fusion of both the stamen and pistils. In other flowers these are separate. The stigmatic surface is hidden within the column.
- Waxy pollen packets called pollinium (plural, pollinia) contain many thousands of tiny sees. The waxy, rather than dusty pollen packet is what makes orchids hypoallergenic.
- The protocorm can only be observed under a microscope in orchid seedlings. It looks like a tuberous cluster is misshapen green grapes.
- Flower parts grow in multiples of three, or monocots. For example, there are 3 sepals and 3 petals. Many orchids have fascinatingly shaped lips, or labella, that act as a landing pad for pollinators.
Terrestrial vs. Epiphytic Orchids
Orchids can either be terrestrial and planted in soil or epiphytic and grow in the air, on a support. Most indoor orchids are epiphytic and have fleshy roots with an outer layer composed of white cells known as velamen. This velamen coating acts like a sponge, absorbs water, and shields the roots from moisture and heat loss.
How Do Orchids Grow?
Orchids are classified into two categories when it comes to their growth habits.
Monopodial
Orchids that are monopodial are characterized by one upright stem growing from just a single bud. Their leaves grow along this stem opposite each other. New leaves are formed from the apex every year. They will produce flower stems from the base of their uppermost leaves. Common examples of monopodial orchids are vanda, vanilla, and phalaenopsis.
Sympodial
This growth habit is the more common one for orchids. Sympodial orchids grow horizontally, according to the surface of their support. A plant will produce a series of new shoots from its old rhizome, with the leaves and the flowers forming at the top of these new shoots. Some of these orchids form pseudobulbs or swollen shoots that store nutrients and water. These pseudobulbs will help the plant survive prolonged periods of drought.
Some common examples of sympodial orchids are cattleya, dendrobium, cymbidium, and oncidium.
Pick the Best Orchids To Keep Indoors
Orchids may be notoriously known for being difficult to grow, but some species are possible and actually easy to care for indoors. As such, it is essential that you get the right ones to keep inside your home. You can get these orchids from credible garden centers, nurseries, and plant sellers online, and you can always ask them for care guidelines.
- Phalaenopsis or Moth Orchids. Moth orchids or phalaenopsis are some of the most common and most affordable types of orchids. They are popular and easy to find, and you can get them from flower shops and supermarkets. Their lovely blooms come in a wide variety of hues, including white, pink, purple, green, yellow, red, and orange and these stay the longest, too.
- Cattleya Orchids. Cattleyas don’t just make lovely cut flowers for your corsage, but they are great as indoor plants, too. Their fragrant flowers are big enough and are eye-catching, plus they last for weeks. And when you give them plenty of sunlight, they would rebloom rather quickly.
- Dendrobium Orchids. Dendrobiums are yet another easy-to-find and easy-to-grow orchid species. Their flowers are long-lasting, and they come in a wide range of colors.
- Cymbidium Orchids. Cymbidiums are easy-to-care-for orchids and are very popular as indoor houseplants. In early spring or winter, they would produce long-lasting blooms that are waxy and too pretty and perfect that they almost look like one of those plastic flowers.
- Oncidium or Dancing Lady Orchids. Oncidiums are pretty low-maintenance, but they will give you clusters of bright-colored little flowers. These blooms come in shades of yellow, orange, red, white, pink, purple and often have contrasting and flashy markings.
- Paphiopedilum or Lady’s Slipper Orchids. Lady’s slipper orchids are pretty distinct with their variegated foliage and big flowers with a hollow pouch, two petals, and a sepal. And it is nice that they are relatively easy to care for and low-maintenance. However, they are not as easy to come by as moth orchids and dendrobiums.
- Odontoglossum Orchids. Odontoglossum orchids are easy to grow and closely related to oncidiums. They produce clusters of big flowers with spectacular colors. The blooms last for weeks and come in various white, red, pink, yellow, and orange shades, usually with splotches of different colors.
- Brassavola Nodosa or Lady of the Night Orchids. The Lady of the Night orchid got its name from the pleasant fragrance that its flowers give off, most especially at night. This orchid blooms multiple times a year. It is easy to care for and is very affordable.
Get Your Orchids Supply Ready
Along with purchasing the plants to brighten up your indoor living space, you also need to get some supplies ready. These supplies are also readily available at garden centers, in the garden section of hardware stores, and reputable garden supply sellers online.
Orchid Pots
Orchids typically prefer small pots, especially ones that are made of plastic. This is because plastic pots make it easy for you to detach your orchid plants’ roots when you need to re-pot them. You may also want to get special orchid pots, which are different from the usual pots in that they have holes or slats on the side or more holes at the bottom. These extra slats and holes ensure good aeration and drainage. Click here to learn more about orchid pots.
Orchid Growing Media
Most orchids that we keep indoors are epiphytes and, therefore, don’t need soil to grow. So you will have to get a unique growing medium that allows their roots to cling. This growing medium should allow quick water drainage and provide your plant with good air circulation.
You can get ready-to-use orchid potting mixes or make your own. Your choice of potting materials should depend on what kind of orchid you are growing or keeping indoors. You can prepare fir bark, sphagnum moss, dried fern roots, rock wool, perlite, stones, coconut fiber, perlite, lava rocks, cork nuggets, or a combination of any of these materials. I use and recommend a high-quality fir-bark-based potting mix from rePotme.
Epiphytic orchids also love being wired or attached to cork, tree branches, or tree fern slabs. Click here to learn more about potting media for orchids, or click here to learn more about how to mount orchids.
Grow Light
A lot of orchid species originated from tropical regions, so they enjoy filtered sunlight. In fact, around 12 to 14 hours of bright but indirect ideal. However, unlike in a tropical environment where the intensity and duration of natural light are consistent, these vary in temperate climates. More so if you are keeping your orchids indoors.
As such, placing your orchid in an area of your house that is exposed to bright light for a few hours each day may not be enough. This can be easily remedied by supplementing natural sunlight with artificial light. A grow light also comes in very handy during the winter. Click here, to learn more about how to give your orchids the right amount of light.
You can get grow lights from garden suppliers and reputable sellers online or make your own. You can watch this video tutorial to know how you can set up your own grow light:
Fertilizer
Your orchids cannot get all the nutrients they need from their growing medium, so fertilizers are essential to ensure healthy growth. Fertilizers will also help your orchids produce flowers to further beautify your home.
Expert gardeners recommend using a liquid fertilizer, diluted and applied during their active growth period. This means you won’t need to feed them in midwinter. It is also not advisable to feed orchids right after repotting.
Some growers use a 10-10-10 fertilizer, while others prefer a 10-10-30 or a 30-10-10. These numbers stand for the NPK ratio, nitrogen, phosphorus, and potassium.
You may also want to prepare seaweed extracts or fish emulsion. You can mist your orchids with these to give them essential micronutrients. Be aware that these fertilizers likely have an unpleasant odor.
Cutting Tools
If you don’t already have cutting tools like pruning scissors and various-sized garden shears, then it is time to get some for yourself. When you buy orchids from a store, you may want to re-pot them immediately. The repotting process involves inspecting their root system and cutting off those that are already soft and dead. For this, you will need thinning shears or needle-nose pruners to be able to get through the intertwining roots.
Garden shears and other plant cutters are readily available in hardware stores.
Accessories
You will need accessories like stakes and orchid supports, plant labels, flower clips, and orchid mounts, depending on what kind of orchid it is you have. For example, the stakes and flower clips are needed for phalaenopsis orchids since their flower spikes tend to grow long and their flowers are heavy. Without these stakes and support clips, the plant would be out of balance and could tumble and turn upside down.
Inspect Your Orchid’s Root System and Re-pot
Repotting your orchids should always be the first thing you need to do after buying them. While these plants don’t like to be disturbed, you must learn how to inspect their root systems and get rid of any root rot early on.
Moreover, many orchids, especially those in bloom and are bought from flower shops, have existing root issues, are planted in old medium, and have not been treated properly. As such, giving these plants a good start in a fresh, new medium is always a great idea.
Watch this video tutorial and learn how you can clean the roots of your orchid and how to move it to another pot:
Here are the steps to cleaning your orchid plant’s root system and repotting:
- Take your new orchid out of its current pot and gently remove and clean off the potting medium clinging to the roots.
- Rinse the roots in running water.
- Remove the dead roots as they no longer serve a purpose. This step is crucial since dead roots don’t absorb water and nutrients, and they will only decompose in your new medium and make it spoil faster.
To determine if a root is dead, try to pinch and squeeze it in between your thumb and index finger. Healthy roots are firm and plump, while dead ones are soft, spongy, and mushy. The outer layer or velamen of dead and rotten roots also pulls out easily, leaving a stringy core, which is the actual root but is useless without the velamen.
As such, you can cut out the dead parts of the root, including the stringy core, and leave the firm and healthy ones. If only the tip is dead, then cut the tip off.
When clipping off the dead part of a root, you should not cut into the green and fleshy area as it will leave an open wound. Instead, cut into the already dead tissue and leave the whole, healthy green part behind.
- Get a slotted pot that is not too big or too small for your orchid.
- Put a fresh medium layer into the pot’s bottom and position your orchid in the center. Gradually fill the pot with the medium while still holding the orchid upright. Make sure to tap the pot to get rid of air pockets.
- Keep the crown of your orchid just a little below the top portion of the pot. It would also help to use a stake or wire to secure your orchid until its roots are already established.
How often you re-pot depends on what type of orchid you have. Typically, repotting is done every couple of years. Some also need to be repotted every year. Meanwhile, others are just happy to remain untouched for several years. However, if you notice that your orchid has stopped blooming given all other conditions are right, repotting it may be the best thing to do.
You will also need to re-pot if you notice that the growing medium is starting to break down and does not allow enough aeration for the roots. Moreover, if you see that your plant’s roots are already creeping out of its pot or if new shoots or growths have disturbed the plant’s balance, then repotting should be in order.
If limp orchid leaves are a problem for your orchids download my free cheat sheet on how to prevent limp leaves and rotten roots. Click here for the super helpful cheat sheet.
Give Your Orchids Adequate Sunlight
Orchids have different lighting requirements. Most of them need plenty of light, which means at least six hours of exposure a day. However, many can withstand more or less this amount of sunlight. You just need to remember that less light reduces an orchid plant’s potential to produce flowers while more light enhances it.
You will know whether the amount of sunlight you are giving your plant is adequate. Leaves that have a grassy or medium green color with yellowish tones mean that the plant is getting sufficient sunlight. Meanwhile, deep dark green leaves indicate that it is not getting enough light.
Generally, your orchids’ best spots to get bright, indirect natural sunlight is the east- and south-facing windows. Windows with northern exposure tend to be too dark, while those with western exposure tend to be too hot, especially in the afternoons.
Exposing your plant to too much direct sunlight causes burnt leaves, leaving them bleached out. Ultimately, sunburnt leaves turn black and die. As such, if you notice that your orchid is getting more than enough direct sunlight, you may want to reposition it or add a sheer curtain to lessen the intensity of light and heat.
Provide Artificial Lighting
If you do not have a window location ideal for your orchids, you can use artificial lights to provide them with the light and heat they require. Make sure to position your orchids up to six to eight inches away from four-foot fluorescent bulbs.
Some growers are particular about the differences between warm white, cool white, and grow light bulbs and the benefits of each one. The great news is that you will now be able to get full-spectrum bulbs, and they would be an excellent overall option.
Water Adequately
Keeping orchids inside your home means growing them in pots that are filled with a medium made of loosely packed materials. These materials are used to keep the roots well-aerated and water drainage. This is because nothing kills orchids quicker than when you let them sit in water.
You will need to water your orchids thoroughly and do it once a week. This would allow the plants to dry a little before the next watering schedule. One thing you may want to take note of is that orchids can withstand being forgotten and going dry every now and then, but not when you overwater and give them excessive moisture.
Maintain Ideal Temperature
Most orchids experience a significant difference in their natural habitat between the temperatures during the day and the ones at night.
This is why many growers who keep their plants indoors or in greenhouses manipulate the temperature so that it drops a minimum of 10 degrees during the night, especially in the fall and winter, since many orchids form buds at this time. Manipulating temperatures this way with your thermostat will promote budding in the orchids.
However, different orchids have different temperature requirements. There are three main temperature groupings: warm growers, intermediate growers, and cool growers. These groupings pertain to the lowest temperature that the plants prefer at nighttime during the winter. However, most orchids can withstand lower or higher temperatures without severe damage.
For instance, warm growers don’t like it if temperatures drop below 60 degrees Fahrenheit (15.56 degrees Celsius). An example of a warm-growing orchid is a phalaenopsis. Intermediate growers prefer a temperature of around 55 degrees Fahrenheit (12.78 degrees Celsius) during a winter night. One example of an intermediate-growing orchid is a cattleya.
Meanwhile, a cool grower prefers winter nights to be 50 degrees Fahrenheit (10 degrees Celsius). Cool growers include odontoglossums and cymbidiums.
Provide Ideal Humidity
Most orchids that originated in tropical climates prefer 60 to 80 percent humidity levels. So humidifiers can be used in homes with heating and cooling vents where the humidity level is far below that percentage or in areas where humidity levels hover near 30 percent during winter. Protect your home by keeping humidity at 50 percent and adding air movement with a fan.
In the absence of a humidifier, you can use humidity trays filled with rocks, gravel, pebbles, and water. You can also use a mister or sprayer to give your orchids additional moisture. Increasing humidity levels encourage better flowering. Click here to learn more about providing humidity for your orchids.
Feed and Fertilize Your Orchids
Orchids are not as demanding as other houseplants when it comes to fertilizer. That means they don’t require high fertilizer doses to stay healthy and to bloom.
You can use a liquid 20-10-20 fertilizer and apply a diluted or weak solution once a week during its active growth period. More specifically, you can dilute it to 25 percent of the recommended strength, as indicated in the packaging. Then, to flush out whatever fertilizer salts the plant has accumulated, you can water it with plain water once a month.
In the autumn, you can switch to a flower-boosting fertilizer. Fall is the budding or flowering season for many orchids. Bloom boosters have higher phosphorus and lower nitrogen ratios. The bloom season is usually at its peak between December and April.
Keep an Eye Out for Orchid Pests and Diseases
Proper orchid care does not stop with watering, feeding, and providing light. You should also look out for pests and diseases that could bring damage to your plant. And just because you are keeping your orchids indoors does not mean that they are no longer susceptible to these. They can still be prone to scale, aphids, mealybugs, fungi, and bacteria. These pests can be treated with organic insecticidal soap.
RePot Me also says that the best defense against infections is a good offense. It recommends spraying the foliage of your orchid monthly with Physan, which is a broad-range fungicide, virucide, algaecide, and disinfectant, as a preventative measure. Dilute one teaspoon of Physan to one gallon of water. You may also get some cinnamon and keep it near your orchids as it is a safe and effective way to deter fungi and bacteria.
If something has infected your plant and it just isn’t able to recover, then it is very likely that the problem is beneath the surface, where you cannot see it. In such a case, repotting is an excellent solution. Click here to learn how to prevent, identify and treat orchid pests and diseases.
How To Care for Orchids After Flowering
Orchid plants usually stay in bloom for about six to 10 weeks. And when this flowering period is over or when the flowers have fallen off the stalk, you would want to snip off this flower spike that appeared near the base of your plant. Doing this will help the plant redirect its energies towards root development. This, in turn, will make the plant healthier and even increase the chances of producing new bloom spikes.
If you want to find exactly where to cut your orchid’s flower spike after it has bloomed, start by downloading my free cheat sheet to see where to cut the orchid flower spike after blooms have faded to trigger re-blooming. Click here for the cheat sheet. It’ll be super helpful.
Generally, nothing has changed with post-bloom orchid plant care, but it relies on sterility in order to keep disease contagions at bay.
Final Thoughts
Caring for orchids indoors may sound like a pretty complicated topic, considering that there are so many varieties and species of orchids. They all have different characteristics and different needs. But when it comes down to it, some basics remain the same.
Orchids, for one, love thorough watering but hate being water-clogged. They also love well-draining pots and a growing medium that drains water fast and promotes good circulation. They will also benefit significantly from regular fertilizer application.
All in all, orchids are easy to care for indoors once you get the hang of it.
Discover More About Caring for Phalaenopsis Orchids
Sources
- Wikipedia: Orchidaceae
- Wikipedia: Floral Symmetry
- Wikipedia: Resupination
- Gardeners: How to Grow Orchids
- Better Homes & Gardens: 15 Easy-to-Grow Orchids that Will Brighten Up Your Home
- YouTube: How To Set up a Grow Light DIY for Less Than $40
- Home Stratosphere: 17 Different Types of Gardening Shears
- YouTube: Orchid Care for Beginners – How to Repot Phalaenopsis Orchids
- Gardening Know-How: Orchid Growing Tips: How To Take Care Of Orchid Plants Indoors
- American Orchid Society: Growing Healthy Orchids Indoors
- RePot Me: Orchid Care: 10 Easy Tips
- P Allen Smith: How to Care for Phalaenopsis Orchids After They Bloom
- Gardening Know-How: Orchids After Blooming: Learn About Orchid Care After Blooms Drop