Orchids 101
When I first started growing orchids, I carefully followed the directions on the label. And, my orchids kept dying. I didn’t give up. I kept growing orchids – learning by trial, and error, I now grow gorgeous, healthy orchids. This article details what I wish I’d known 12 years ago -Phalaenopsis Care for Beginners.
Foolproof Phalaenopsis Orchid Care for Beginners
- Keep the potting mix barely damp
- Don’t use aerial roots to determine if your orchid needs water
- Orchids growing in sphagnum moss benefit from removing the liner pot
- If needed, add humidity with a humidity tray
If you want the most basic of bare-bones orchid care tips this article is for you. To properly care for your first orchid, will not need any expensive equipment or specialized training. Instead, I am sharing with you simple things you can do to be on track to successfully care for your first orchid – the phalaenopsis, also known as the moth orchid.
Some of the links on this page may be affiliate links. Click here to learn more.
1- Phals Like Their Potting Mix Slightly Damp
Don’t let phalaenopsis orchids sit in water, but don’t let them dry out either. These orchids do not have water storage in the form of pseudobulbs and need water. The rule of thumb for moth orchids is to keep their potting mix barely moist.
To get a handle on watering orchids, begin by understanding the properties of your potting medium.
Fir bark is a popular potting medium for 2 reasons. First, it is well-draining. Second, it is chunky and allows for air movement around the roots. Both of these elements are essential for healthy orchids. But, sometimes, bark can be too fast-draining for phalaenopsis orchids. Phals do not have any water storage. Hence, phals need a slightly damp, not soaking potting medium.
The next most popular potting medium for orchids is sphagnum moss – which is highly water-retentive. This is great because it keeps orchids from dehydrating, but sphagnum moss can result in rotted, over-watered roots.
How to combine the best of both worlds so your phalaenopsis gets a lightly damp mix and lots of airflow in a fast-draining medium: Use a bark-based mix. I find that when growing orchids indoors, my Phalaenopsis orchids thrive best when the bark potting mix is supplemented with a bit of sphagnum moss. One helpful and reputable resource for potting supplies is rePotme. Click here to go to rePotme (affiliate link).
Improper watering often causes a host of problems, resulting in an unhealthy orchid. To avoid these pitfalls, click here to grab your cheat sheet to learn how to grow healthier orchids. It will be super helpful.
2- Don’t Use Aerial Roots to Determine if Your Orchid Needs Water
Check the roots that are growing down into the mix. (I know, that sounds like a no-brainer). When I first started growing orchids, I kept looking at the aerial roots because they were easy to see, and I’d think, ooh, those look dry – and I’d add a few ice cubes to the potting mix.
Don’t do what I did. Instead, look at the roots growing down in the potting medium. Lots of orchids come in a clear, plastic grower pot. These are wonderful because they allow you to look at the roots.
If your orchid is in an opaque pot that won’t let you see the roots, stick your finger or a wooden skewer down into the medium to check for dampness. You can also heft the pot. If it feels heavy, the potting mix is wet. If the pot feels light, your orchid is ready for water. This method takes a bit of practice – but it is reliable.
CLICK HERE to learn more about orchid roots.
3- If You’re Growing an Orchid in Sphagnum Moss, Remove the Plastic Liner Pot
I know, I just recommended clear plastic pots, and I still do. These pots give you a front-row seat to what’s going on with your orchid roots.
BUT, if your orchid grows in 100% sphagnum moss, it may retain too much water. By removing the culture pot, the moss will dry out faster, won’t retain as much moisture, and will allow air to reach the orchid’s roots. It’s a win, win, win.
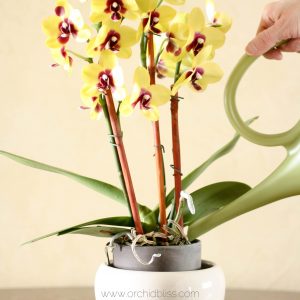
4- Increase Humidity with a Humidity Tray
Just like orchids need their roots watered, they also need their leaves watered through the water in the air, water vapor. Humidity provides water to the orchid’s leaves and assists orchids as they absorb carbon dioxide and release oxygen.
If there is not enough humidity in the air, orchids close the tiny openings in their leaves, called stomata, and stop the exchange of carbon dioxide and oxygen.
Without enough humidity, there is an air of blah about the orchid. It just looks stagnant. The leaves are slightly wrinkly and less shiny. The orchid will look like it’s suffering. I know that sounds nebulous, but it’s true.
The easiest way to give your phal a humidity boost is with a humidity tray. In its simplest form, a humidity tray is a shallow tray, platter, or plate filled with pebbles and then filled with water. The orchid pot sits on top of the tray filled with water and pebbles. Be sure that the orchid pot does not sit in the water. The orchid roots should not touch the water in the humidity tray.
CLICK HERE, to learn more about why orchids need humidity and how to give them what they want.
Bonus Tips – Phalaenopsis Care for Beginners
If you follow the above 4 tips, your orchids will be in good hands. Just by following that handful of steps, you’ll be far ahead of me when I started with my first orchid. But, if you feel like you’re ready to do more for your orchid, here are a few more easy things you can do to improve care for your first orchid.
5- Location – Location – Location – Provide Bright, Indirect Light for Your Phalaenopsis
Phalaenopsis orchids do not need as much light as many others, but they still need bright, indirect light. Many people find that a bright east-facing window provides enough light for their phal to build up enough energy to re-bloom.
Protect your orchid from intense or direct light by moving it a few feet away from a window or hanging a sheer curtain to protect your phalaenopsis from sunburned leaves.
CLICK HERE, to learn more about how to give your orchids more light.
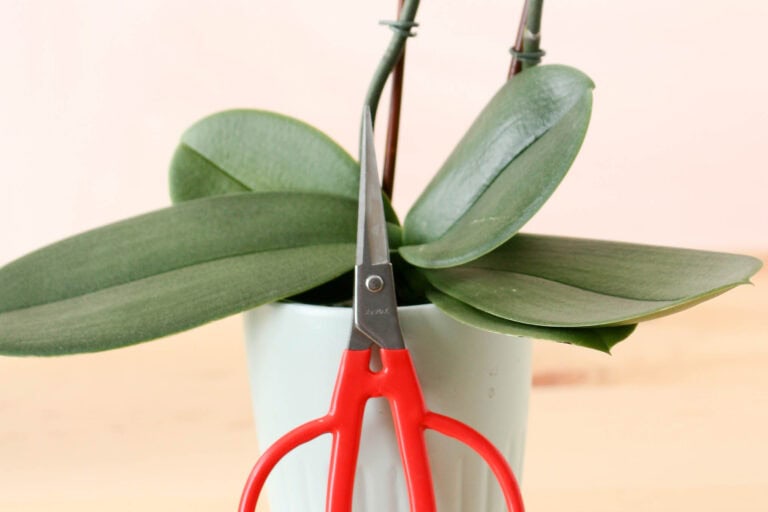
6- Where to Cut the Flower Stalk: 1-inch Above the Base
Unlike most orchids, phalaenopsis orchids can continue to flower on the same stalk. The long flower stalk can continue to produce flowers, and the stalk will continue to grow.
I’ve found that this is not exactly attractive. Imagine a long flower stalk bereft of flowers – until waaaaaay out there on the end you see a flower. This lonely flower is a far cry from the cloud of blossoms that originally graced the orchid.
Remember, don’t let your phal bloom and bloom. There is no trophy for the longest-blooming orchid.
Instead, once the first cloud of blossoms is spent, I recommend cutting the flower spike about 1 inch above the base of the plant. This way, if you do want to try your hand at re-blooming, your orchid will be able to rebuild its strength and grow a whole new flower spike, complete with a whole new profusion of flowers.
To help you further, download my free cheat sheet to see where to cut the orchid flower spike after the blooms have faded to trigger re-blooming. Click here for the cheat sheet. It’ll be super helpful.
7- Why Did My Orchid’s Buds Shrivel and Die? Discover How to Protect the Buds
It is called bud blast when seemingly healthy flower buds wither and drop for no apparent reason. Bud drop happens because the orchid’s buds are the most tender part of the plant. Phalaenopsis orchids are vulnerable to bud blast, but it is preventable.
Bud blast is caused by a sudden change in the orchid’s growing environment. Here are a few things to watch out for:
- Sudden changes in the watering schedule. Don’t neglect your orchid when on vacation or when you have visitors or another schedule change.
- Sudden temperature change. Be aware of drafts from air vents, exterior doors, fireplaces, and wood-burning stoves.
- Apply fertilizer when buds are forming.
- Air pollution: Use caution when transporting your orchid.
CLICK HERE, to learn more about protecting orchids from bud blast.
8- Phalaenopsis Care for Beginners – Health Checklist
To give good orchid care, you must be able to prevent, identify, and treat orchid pests and diseases. Orchids are generally healthy plants, so don’t get too worried about this section. Though inevitable, you will need it at some point along your orchid journey.
How to Prevent Common Orchid Pests and Diseases
- Keep your orchids healthy. A strong, healthy plant is much better positioned to fight off pests and disease than a weak, struggling plant.
- Use good hygiene. Sterilize tools when working with orchids. For example, keep your pruning shears sanitized with rubbing alcohol or a flame from a butane torch. Or, use a disposable single-use razor blade to clean up your orchid. Always sterilize tools when working from one orchid to another.
- Air movement. Do what you can to keep good airflow around your orchids. Turn on a ceiling fan or another small fan. At the lowest setting, point the fan away from your orchids. Weather permitting, crack a window. Air movement will keep fungal and bacterial infections from taking hold of your orchids.
How to Identify and Treat Common Orchid Pests
| PEST | IDENTIFY | TREAT | PHOTO |
| Scale | Hard light, brown bumps that you cannot scrape away indicate Boisduval scale. | With an old toothbrush and 70% rubbing alcohol, and a pair of surgical gloves scrub every nook and cranny of your orchid. | 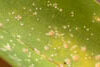 |
| Mealybugs | Cottony, web-like substance around the base of the plant on pseudobulbs, rhizomes, or on the underside of leaves. | Isolate infected orchids. Spray the plant with horticulture oil. This is most effective when bugs are in the nymph phase. | 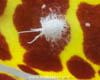 |
| Spider Mites | Not all spider mites spin webs. Because the mites are so tiny, the best indicator of spider mites is tiny indents. | Isolate infected orchids. Spray the plant with horticulture oil. This is most effective when bugs are in the nymph phase. |  |
| Aphids | Look for aphids on the most tender parts of your orchid. Look for soft-bodied green, yellow or black soft-bodied insects. | Take your orchid outside and spray off the aphids. Watch closely. It only takes one aphid to reproduce and start a colony. |  |
| Ants | Ants love honeydew which is secreted by healthy orchids. Honeydew is also excreted by aphids and mealybugs. | When you see ants, look for other pests. Otherwise, a damp cloth will clean up the honeydew and the ants will go away. | 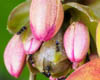 |
| Snails & Slugs | Look at night when they come out to eat new growth – including buds and flowers. Watch for the slime trail. | Use a product called Sluggo. Sprinkle it around your orchids. The snails and slugs will feed on the Sluggo and die. | 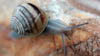 |
| Prevention | Make it a habit to check for pests when you: | – Water – Re-pot – Buy – Sterilize tools with a flame or rubbing alcohol |
How to Identify and Treat Common Orchid Diseases
| DISEASE | IDENTIFY | TREAT | PHOTO |
| Fungal | Root, rhizome, pseudobulb rot and leaf spots can all indicate fungus. | To treat fungal and bacterial infections, use sterilized pruning shears to cut away affected area. Apply cinnamon paste to lesion. For fungal infections, apply beneficial fungi or, a copper-based insecticidal soap. For bacterial infections, apply beneficial bacteria, or refined horticultural oil or insecticidal soap. | 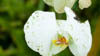 |
| Bacterial | A spotted or sunken area where water was left sitting; a foul smell. | Treat bacterial infections as you would fungal infections. |  |
| Prevention | To prevent fungal and bacterial infections, remember three things: | 1. Use a fan. 2. Always sterilize tools. 3. Try not to overwater, which leads to rot. Rot leads to infection. | |
| Viruses | Viruses are difficult to diagnose. Still, viruses can be identified by a color break in blooms. A viruses tend to be in not on plant tissue. Watch for streaking. | To accurately identify a virus you must take a sample and send it to a commercial lab such as agdia. | |
| Prevention | Here’s how viruses are spread: the sap from an infected orchid comes in contact with a healthy orchid. | To prevent tool transmission make sanitation a top priority. To prevent insect transmission, keep insects under control. |  |
| Sunburn | Identify sunburn by leaf collapse. As time goes on the leaf will continue to deteriorate. A sunburned leaf will feel squishy. | Remove the burned leaf. Apply a cinnamon paste to the orchid where the leaf was removed. |  |
| Prevention | Keep the orchid away from direct sunlight and do not leave an orchid in your car. | – Water – Re-pot – Buy – Sterilize tools with a flame or rubbing alcohol |
Double Bonus – Phalaenopsis Care for Beginners
If you are interested in these tips, I can tell that you are serious about caring for your Phalaenopsis. These tips will get you much further along on your orchid journey. The previous tips were about maintaining a healthy orchid in the short term.
These tips are for those of you who intend to keep your orchid for years to come. You will enjoy the satisfaction of caring for your phalaenopsis and watching it bloom year after year.
9- Feed Your Phal
Phalaenopsis, and all orchids, don’t need much fertilizer. They absorb clean rainwater with minimal nutrients. Provide diluted water-soluble fertilizer for your phalaenopsis orchids for stronger root systems, lush leaves, and abundant flowers.
The key to fertilizing orchids is to remember that less is more. The simplest way to do this is to feed your orchid 2-3 times a month with a complete, balanced fertilizer at ¼ strength.
A complete fertilizer means that the fertilizer contains micronutrients. A balanced fertilizer means that the macronutrients – nitrogen, potassium, and phosphorus – are added in equal proportion.
On the weeks that you do not fertilize, let water flow freely through the potting media to flush away fertilizer salts.
CLICK HERE, to learn more about how to feed your orchid.
10- To ReBloom Your Phal, Don’t Discount Temperature
It is commonly known that orchids without enough light won’t rebloom. Some people don’t realize that temperature is the other half of the blooming equation.
Temperature changes send signals to orchids telling them what to do at certain times of the year. All orchids experience a growth cycle that includes resting and growing new roots, leaves, and flowers.
For most of the year, Phalaenopsis orchids need warm temperatures, between 70°-80°F / 21°-26.7°C. Then, for about a month, during the winter, phals need a temperature drop between 55°-60°F / 13°-15.6°C. These cool temperatures are what the orchid needs to trigger blooming.
CLICK HERE, for more tips on how to give your orchids the right temperature to trigger blooming.
11- Re-Potting – Phalaenopsis Care for Beginners
After a while, your orchid’s potting medium will begin to break down and absorb too many fertilizer salts. Both of these situations will kill the orchid’s roots – then you won’t have your orchid anymore.
To enjoy a healthy orchid, you’ve got to re-pot every couple of years or so.
When to Re-Pot Your Phalaenopsis
The best time to re-pot is after it has finished blooming. And, optimally, when new roots are beginning to grow. The beginning of new roots is especially important for cattleya and dendrobium orchids, and while it is preferable for phalaenopsis orchids, it isn’t a deal-breaker if new roots aren’t emerging.
CLICK HERE, for more details about when and why you need to re-pot your orchids.
How to Re-Pot Your Phalaenopsis
Re-potting your phal will feel strange if you’ve never done this before. The roots are very thick and stiff compared to other plants you may be used to.
- Un-Pot your orchid by taking it out of the pot and picking the potting media off of the roots.
- Use sterilized shears to cut away any dead, mushy roots.
- Use a high-quality potting mix to re-pot. Do not use regular potting soil to re-pot your orchid. Instead, use a well-draining potting mix. Fir bark is the most commonly used potting mix for orchids. I like to use rePotme Potting Mix. This is a long-lasting, premium mix. I also like adding a couple of wool rock pieces to help the mix retain more moisture. If you live in a humid climate, you may not need to add the wool rock.
- Carefully place the orchid in the pot by twisting the roots in one direction and turning the pot in the opposite direction. This will help the roots to curl back into the pot. Add the potting mix as you go.
CLICK HERE, for a step-by-step guide to re-potting orchids.
12- You Don’t Have to Stake the Flower Stalks
This tip optimistically assumes that all has gone well and that your phalaenopsis is growing a new flower stalk.
When a new flower first stalk emerges, that’s the time to train the flower stalk to grow upward. If you wait too long, it is easy to snap the stalk in half.
I know, at the store, all the orchid flower stalks are carefully staked so that the orchids can line up like good, little soldiers. This makes perfect sense for shipping orchids.
Now that your orchid is at home, the original flowers have faded, and, miracle of miracles, you see a new flower spike emerging and growing out at a 90-degree angle from the orchid. No worries. You can let the spike grow out naturally or train it to grow upwards.
How to Use Light to Guide the Presentation of the Flower Stalk
The best and easiest way to train your flower stalk is to position the orchid near a window so the new stalk is pointing away from the window. The stalk will then reorient itself to grow toward the light source. Keep turning the orchid so that the flower stalk grows upwards in an aesthetically pleasing way. Using this method minimizes the risk of snapping and breaking the flower stalk.
At any rate, you don’t have to worry about shipping thousands of orchids, so it doesn’t matter which direction the flower spike grows.
Practice These No-Fail Phalaenopsis Tips and Feel Joy in Your Orchids
Whether growing your 1st or your 101st orchid, these plants continue to brighten our days. No matter how experienced (or inexperienced) you are at cultivating orchids, there is still more to learn and experiments to try.
Remember these 6 Phalaenopsis orchid care for beginners tips, and you’ll be well on your way to growing gorgeous moth orchids:
1- Watering: Phalaenopsis orchids prefer to be kept evenly moist but not overly wet. Water your orchid thoroughly, allowing excess water to drain away, and then wait until the potting mix feels dry to the touch before watering again. Generally, you’ll want to water your orchid once a week, but this can vary depending on factors like humidity, temperature, and the size of your pot.
2- Light: Phalaenopsis orchids need bright, indirect light to thrive. A north or east-facing windowsill is usually a good spot, as it provides plenty of light without exposing the plant to direct sunlight, which can damage the leaves.
3- Temperature: Phalaenopsis orchids prefer temperatures between 65-85°F (18-29°C). Avoid exposing your orchid to extreme temperatures or drafts, as this can cause damage to the leaves and flowers.
4- Humidity: Phalaenopsis orchids are native to humid environments and appreciate a little extra humidity. You can achieve this by placing a tray of water near your orchid or using a humidifier.
5- Fertilizer: Phalaenopsis orchids benefit from regular feeding with a balanced orchid fertilizer. You can apply fertilizer every other watering during the growing season (spring and summer), but avoid fertilizing during the winter months when the plant is dormant.
6- Repotting: Phalaenopsis orchids generally need to be repotted every 1-2 years, as their potting mix breaks down over time. Repotting also gives you the opportunity to trim any dead roots and refresh the potting mix.
By following these basic care tips, you should be able to keep your Phalaenopsis orchid healthy and happy for years to come!
Once you’ve got a handle on the basics of caring for your Phalaenopsis orchid and are ready to fine-tune your expertise, continue to build your knowledge and expertise by experimenting with the more advanced tips.
There’s so much awaiting you in the exciting and rewarding world of orchid culture!
Related Posts
Watering Orchids: No More Guesswork
Learn how to water correctly and you'll avoid the #1 cause of orchid death
Read